GCP – DLP provisioning with Terraform

This post will address provisioning of the DLP service in GCP using Terraform. Terraform is a great IaC provisioning tool that can be used across various cloud providers and because it’s managed by a third party (Hashicorp), it’s a  beneficial choice for multi-cloud configurations, or just for the decoupling aspect it provides.

Now, because the Terraform GCP Provider API is not managed in tandem with updates to the GCP services (DLP in our case) there will not be an exact 1:1 feature parity when using it to provision DLP (i.e. lack of Firestore support). However, for simple configurations it is great to setup basic inspection templates, job triggers, and stored info types . In addition, the Terraform modules provided by Google, may or may not exist for the service you intend to provision. Currently that is true for our case in DLP so we will demonstrate one form of configuration.

THE SETUP

Prerequisites for setting up DLP here will be:

To start, let’s first grab the source code we will be using and describe it starting from main.tf.

provider "google" {
  project     = "{REPLACE_WITH_YOUR_PROJECT}"
}

terraform {
  backend "gcs" {
    bucket  = "{REPLACE_WITH_YOUR_UNIQUE_BUCKET}"
    prefix  = "terraform/state"
  }
}

// 1. Service account(s)
module "iam" {
  source                              = "./modules/iam"
}

// 2a. Storage bucket (DLP source input #1)
module "storage_input" {
  source                              = "./modules/dlp_input_sources/cloudstorage"
  cloudstorage_input_bucket_name      = var.cloudstorage_input_bucket_name
  cloudstorage_input_bucket_location  = var.location
  unique_label_id                     = var.unique_label
}

// 2b. BQ table (DLP source input #2)
module "bigquery_input" {
  source                              = "./modules/dlp_input_sources/bigquery"
  bq_dataset_id                       = var.input_bq_dataset_id
  bq_dataset_location                 = var.location
  bq_table_id                         = var.input_bq_table_id
  unique_label_id                     = var.unique_label
}

// 2c. Datastore table indexes (DLP source input #3)
module "datastore_input" {
  source                              = "./modules/dlp_input_sources/datastore"
  datastore_kind                      = var.datastore_input_kind
}

// 3. DLP output config
module "bigquery_output" {
  source                              = "./modules/bigquery"
  bq_dataset_id                       = var.output_bq_dataset_id
  bq_dataset_location                 = var.location
  bq_dlp_owner                        = module.iam.bq_serviceaccount
  unique_label_id                     = var.unique_label
}

// 4. DLP... finally
module "dlp" {
  source                              = "./modules/dlp"
  project                             = var.project
  dlp_job_trigger_schedule            = var.dlp_job_trigger_schedule
  bq_output_dataset_id                = module.bigquery_output.bq_dataset_id
  bq_input_dataset_id                 = module.bigquery_input.bq_dataset_id
  bq_input_table_id                   = module.bigquery_input.bg_table_id
  cloudstorage_input_storage_url      = module.storage_input.cloudstorage_bucket
  datastore_input_kind                = var.datastore_input_kind
}

This file sets up Terraform to use the GCP provider (provider block) then specifies a GCS bucket to store our Terraform state file in (terraform block) — which is best practice when working with multiple teams members or dealing with revision management.

Next, custom modules are specified to create the various components needed by DLP. This part can be modified to use other Google modules if they fit better instead. Each module provided is basic enough but can be extended to fit other scenarios. What we have is:

  • 1. ) Service Account Module – This module creates the service account which can be used to access the Big Query service and specifically, with the owner role.
  • 2.) DLP Input Source Modules – There are 3 specific modules Cloud Storage, Big Query, and Datastore (a, b, and c) which can be used to create a valid source for data to be checked against. It is most likely, you would only check against 1 source whether it be cloud storage, or a database. Thus you may choose to modify only the one used in your case — the others will be auto created anyway for demonstration purposes.
  • 3.) Big Query Dataset Module – As discussed in #1, this is where the DLP job results will go.
  • 4.) DLP Module – This is where our inspection template and job triggers will be created. The inspection template is set to detect likely matches for [Email, Person Name, and Phone Number], with sample limits and an exclusion rule set. The job triggers are set for each of the input sources we want to check (as seen in #2) with a schedule specified.
    DLP NOTE #1: Because the DLP service can be expensive, this module should be tweaked to the unique needs of your specific project for cost control.
    DLP NOTE #2: Although the module contains a stored info type resource, Terraform can not us it for inspection template info type configuration.

Finally, all we need to do in order to configure the execution is pass in our input parameters into the vars.tf file.

If everything has gone well and you perform Terraform steps listed in the Readme.md, you will see all of your resources created.

Apply complete! Resources: 13 added, 0 changed, 0 destroyed.

TESTING IT OUT

Great! But how do we know everything worked?
First ,we can go into GCP and check that our jobs are created.

DLP Jobs
DLP Jobs

Then we need to add some data in our input sources. We can add both positive and negative test case data in accordance with the inspection template.

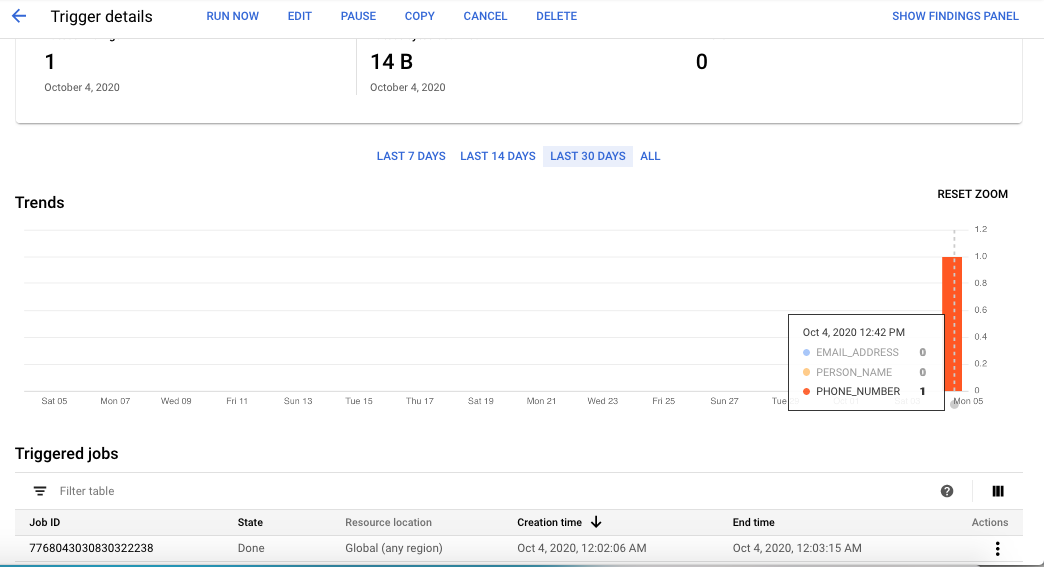
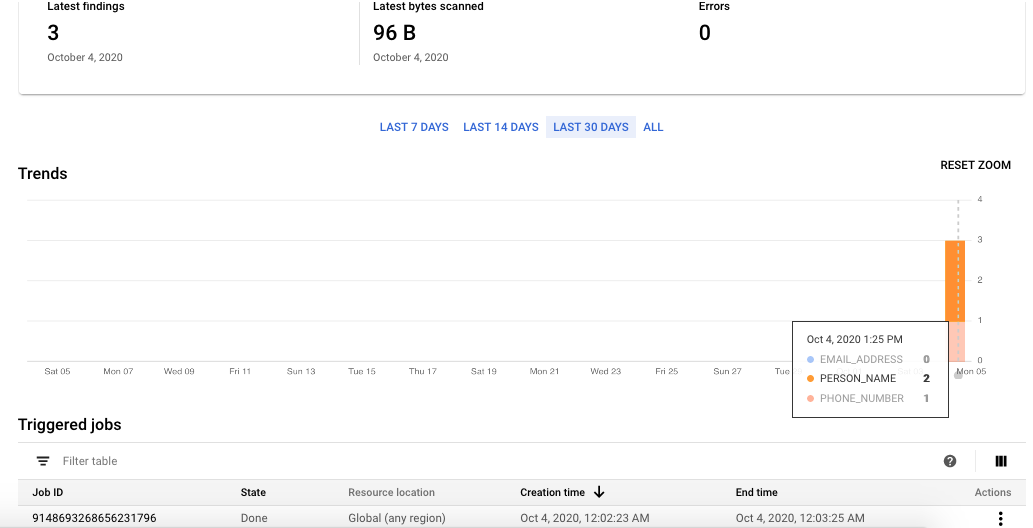
Finally, let’s run the triggers (rather than waiting for the schedule) to test them out.

BQ DLP Run
BQ DLP Run
GCS DLP Run
GCS DLP Run

As we see, this is working as we expected. Awesome!

GCP – Data Loss Prevention (DLP)

Data Loss Prevention  (DLP) is a great feature available in Google Cloud (GCP) that as of current, is unmatched in ability among leading cloud providers — AWS, and Azure. In essence, DLP allows you to find specific information types (i.e sensitive information such as passwords, identification numbers, creds, etc.) from sources (Storage and DB) then report and redact that information. It can operation on multiple file types including text, image, binary, and pdf. This is an excellent way to keep information of interest secure.

This post will discuss a simple resolution to Error Code 7: “Not authorized to access requested inspect template. that may save you time when starting off using the DLP service.

DLP Trigger error - not authorized
DLP Trigger error – Not authorized

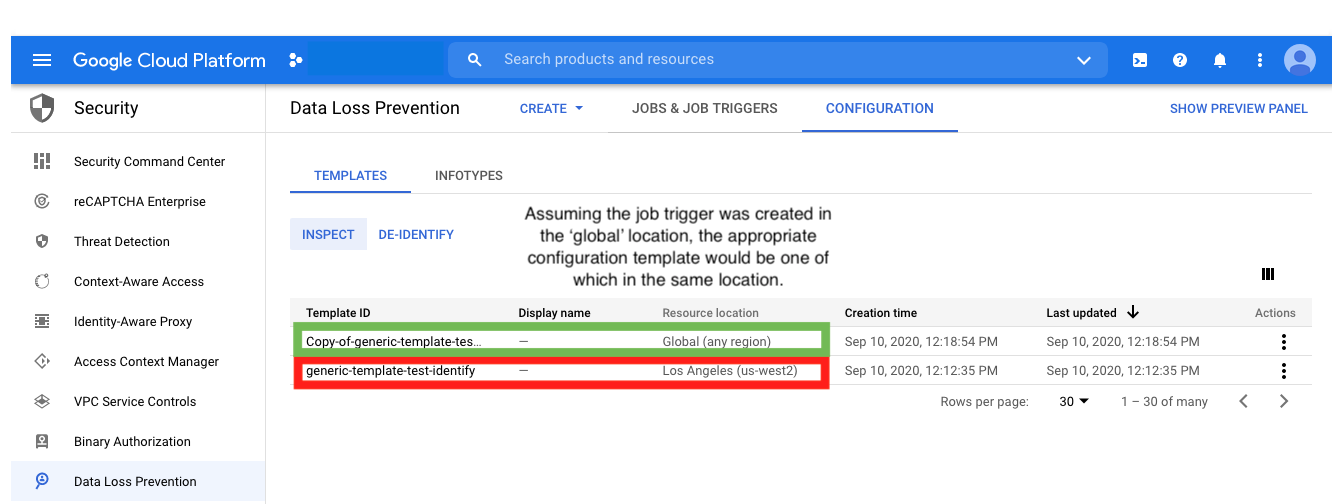
This error can occur when the inspection template is created in a resource location different from the where the job trigger was created. To fix, make sure the trigger and template are in same location. If however there were role modifications on the service account used by DLP API, logically, the permissions to read (see role: roles/dlp.inspectTemplatesReader) need to be added.

DLP configuration template

Overall the issues encountered enabling and starting with the DLP service are minimal and as a whole, it’s intuitive to use. It is usually obvious as to how to resolve any errors (i.e. ‘Permission missing’, ‘resource doesn’t exist/not found’) when they do occur. More on DLP coming soon!

How to become an AWS Certified Developer

AWS Certified Developer AssociateBecoming an AWS Certified Developer Associate will allow you to showcase your conceptual knowledge of AWS services with others, and give you an edge in today’s modern era of cloud computing. The weighted, multiple-choice exam which lasts 130 minutes, contains 65 questions that test your understanding of the AWS Platform, from a Developers perspective. (See the “Exam Resourceshere for more info). You should be familiar with:

  • How to encrypt / decrypt secure data
  • Using IAM policies, identities vs ACLs
  • Why and how to utilize KMS
  • Web Identity and SAML Federation
  • User authentication & authorization
  • What a VPC is and how it can be used
  • Shared Responsibility Model
  • Important Service limits
  • Horizontal (auto) and vertical (compute) scaling
  • Deploying services through CI/CD systems
  • Elastic Beanstalk deployment strategies
  • How to achieve redundancy
  • Best practices in design and refactoring
  • Read/Write Dynamo Capacity Unit calculations
  • Service APIs
  • The following services and how they can be used together:
    • API Gateway
    • Elastic Beanstalk
    • CloudFormation
    • CloudWatch
    • Cognito
    • EC2
    • ELB
    • Elasticache
    • IAM
    • KMS
    • Lambda
    • Kinesis
    • DynamoDB
    • Code Commit / Build / Deploy / Pipeline
    • Step Functions
    • S3
    • SNS
    • SQS
    • SWF
    • STS
    • X-Ray

The exam is not easy and rote memorization without experience and understanding of AWS services will guarantee failure — you need a 740 / 1000 to pass. If there is a particular AWS service you have not used, it is highly recommended to dive in and experiment with using it, while also taking into account how it can be used with other services. For example:

A) As a  developer you could use CloudFormation to provision a stack with a DynamoDB NoSQL DB, and an EC2 M5 instance as the server hosting your web service instrumented with X-Ray and using Cognito to manage user identities. All with the proper IAM policies in place.

or

B) As a developer you could deploy a Lamda package stored on S3 with API Gateway as the primary endpoints/event triggers and configure CloudWatch to send a message to SNS topics that will notify subscribers if certain a certain metric threshold has been reached. All with the proper IAM policies in place.

When preparing for the exam, it is recommended to take the practice exam from the AWS training site to familiarize yourself with the question format. This method is in contrast to taking practice exams from other 3rd party training sites — whereby the questions are limited to the course’s range and are often of insufficient difficulty. If you encouter any questions that don’t know or are too broad (there are often multiple answers but 1 “best” answer) take a step back and review that area to gain a better understanding.

After you pass the exam, you can share your recognition with the world by generating a badge, email signature, or transcript in the AWS Certification portal (Certmetrics). Additionally you can buy branded swag, gain access to AWS Certification Lounges at events, recieve discounts on future exams, and more

Good luck on your journey to becoming AWS Certified Developer Associate!

Testing email verification with Google Apps Script

Automated email verification is something that can help streamline testing by circumventing the need for manual intervention. In cases where you have control of the email provider and recipient, it is possible to use an API to interface with this email account. This post will address how to perform do this email verification with Google Apps Script.

Conceptual Overview

What we want to do is access a target Gmail account and perform CRUD operations on the emails. But how?

  1. Google Apps Script will provide us with a public customizable API proxy to perform those CRUD operations.
  2. Our client consumer will interact with the deployed Google Apps Script API proxy, executing the correct HTTP method as well as the request parameters necessary to operate on the Gmail account. A response should be returned so that the client can identify the result of the operation.

Setup

  • Create a new Gmail account that will be used with automation.

    Create Google Account
    Create Google Account

Design

  • Navigate to Google Apps Script and develop your application. For our purpose, we will simply need 1 post method that will take a JSON body in the parameters:
    • emailCount — How many of the most recent emails to check
    • subjectPattern — Regex pattern that the email subject should match against
    • dateAfter — Dates after this will be included as emails to check (ISO 8601)
    • timeout — How long in seconds should we wait to check the emails

The editor will provide you with auto-completion. See this page for the complete Apps Script Reference. In addition, you can enable more API’s using Resources > Advanced Google Services.

Keep in mind, this is YOUR API proxy around the facilities that Gmail provides, you can perform way more capabilities than what is seen here.

/**
/**
 * Process unread emails and return latest match (stringified json)
 * according to subject Regex after marking it as unread
 * Waits n Seconds until a non-empty response is returned
 *
 * {
 * emailCount = Integer
 * subjectPattern = "String.*That_is_regex.*"
 * dateAfter = Date.toISOString()
 * timeout = Integer (seconds)
 * }
 */
function doPost(e) {
  var json = JSON.parse(e.postData.contents);
  
  var emailCount = json.emailCount;
  var subjectPattern = json.subjectPattern;
  var dateAfter = json.dateAfter;
  var timeoutMs = json.timeout * 1000;
  
  var start = Date.now();
  var waitTime = 0;
  var responseOutput = {};
  
  while(Object.getOwnPropertyNames(responseOutput).length == 0 && waitTime <= timeoutMs ) {
    responseOutput = controller(emailCount, subjectPattern, dateAfter);
    waitTime = Date.now() - start;
  }
  
  return ContentService.createTextOutput(JSON.stringify(responseOutput)); 
}


function controller(emailCount, subjectPattern, dateAfter) {  
  var responseOutput = {};
  
  for(var i = 0; i < emailCount; i++) { // Get the msg in the first thread of your inbox var message = GmailApp.getInboxThreads(i, i + 1)[0].getMessages()[0]; var msgSubject = message.getSubject(); var msgDate = message.getDate(); // Only check messages after specified Date & Subject match if(msgDate.toISOString() >= dateAfter) {
      if(msgSubject.search(subjectPattern) > -1) {
        if(message.isUnread()){
          GmailApp.markMessageRead(message);
          
          responseOutput = getEmailAsJson(message);
          break;
        }
      }
    }
  }
  
  return responseOutput;  
}


function getEmailAsJson(message) {
  var response = {};
  
  response["id"] = message.getId();
  response["date"] = message.getDate();
  response["from"] = message.getFrom();
  response["to"] = message.getTo();
  response["isRead"] = !message.isUnread();
  response["subject"] = message.getSubject();
  response["body"] = message.getBody();
  response["plainBody"] = message.getPlainBody()
  
  return response;
} 

When you are done, save your script.

Publish

  • Deploy your script as a web app to act as a Proxy. You will need:
    • Project version to deploy into (with commit comment)
    • Who this app will execute as — Basic security
    • Who has access to the app — More security

      Deploy Script as Web App
      Deploy Script as Web App

After continuing, your app should be deployed to a public Google Apps Script URL, which you will access as your API Proxy. Copy the endpoint URL you will use it next.

Run

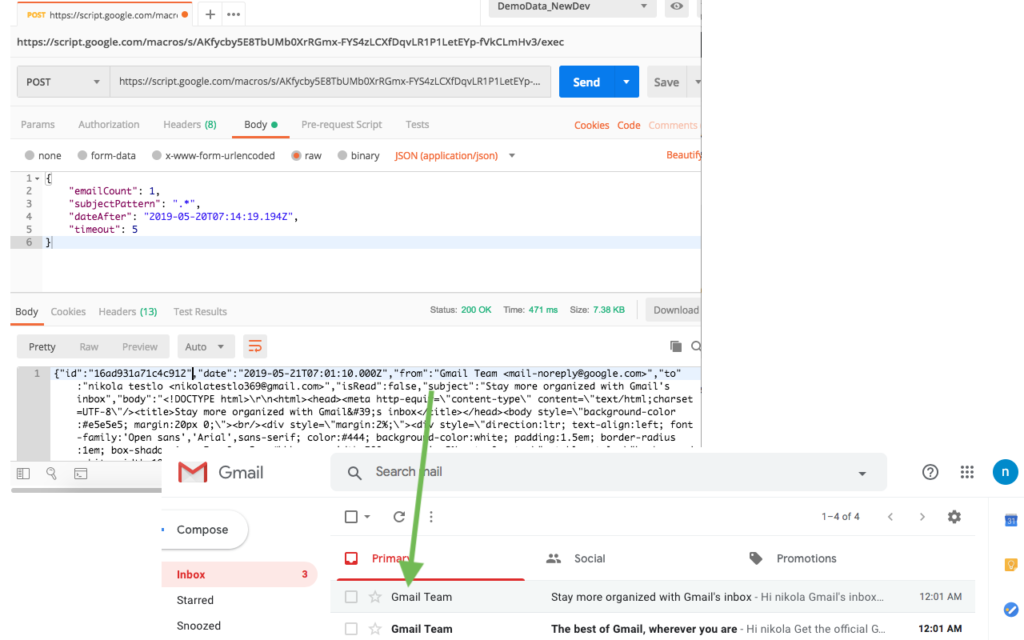
  • Test it out! For this, I’ve accessed the web app endpoint with the following json body to find the 1st latest email after 05/20/2019 7:14:19 UTC
{
	"emailCount": 1,
	"subjectPattern": ".*",
	"dateAfter": "2019-05-20T07:14:19.194Z",
	"timeout": 5
}

As expected, the latest email was returned in a JSON request that also includes some metadata. It also marked the email as read, so subsequent requests will not reprocess it — all as specified in our script. Super!

Postman API post request to Google App Script

Integrate

  • With our client app, we may have something like this which works on our Google Apps Script
package com.olandre.test.email;

import io.restassured.RestAssured;
import io.restassured.response.Response;
import org.json.simple.JSONObject;
import org.openqa.selenium.*;

import java.util.HashMap;
import java.util.Map;
import java.util.regex.Matcher;
import java.util.regex.Pattern;

public class Email
{

    public static final String servicedGmailFullCapabilitiesEmail = "emailuser1@gmail.com"
    public static final String servicedGmailFullCapabilitiesService = "https://script.google.com/macros/s/FAKEGOOGLEAPPSSCRIPTURL/exec";

    public Email()
    {
    }

    public static String getCurrentMethodName()
    {
        return Thread.currentThread().getStackTrace()[2].getClassName() + "." + Thread.currentThread().getStackTrace()[2].getMethodName();
    }

    public String processNewMemberSignupEmail(String email, Integer timeout, String emailSearchPastDate, String firstName,
        String lastName) throws Exception{
        final String NEW_SIGNUP_SUBJECT = String.format( "Welcome %s %s!", firstName, lastName);
        final String SIGNUP_CONTINUE_LINK_REGEX = ".*=\"(http.*/signup/.*)\" target.*";
        final String PLAINTEXT_SIGNUP_TEXT = String.format(
            ".*(Hi, %s! Welcome Aboard .*To sign up, you'll need to create a password.*html.*/register/).*", firstName);

        Request request = new Request();
        Response response = request.checkEmail( email, NEW_SIGNUP_SUBJECT, emailSearchPastDate, timeout );
        return request.findEmailClickthroughLink(
            response, SIGNUP_CONTINUE_LINK_REGEX, PLAINTEXT_SIGNUP_TEXT );
    }

    /**
     * When we decide to add headers, and other metadata
     * to the request, outsource and turn into a generated builder Class
     */
    public class Request {

        private Map<String, String> emails;

        Request() {
            emails = new HashMap<>(  );
            emails.put(servicedGmailFullCapabilitiesEmail, servicedGmailFullCapabilitiesService);
        }

        public Response post(String url, JSONObject body) {
            Response preRedirectResponse = RestAssured.given()
                                                      .redirects().follow( false )
                                                      .body( body.toString() )
                                                      .when().post( url );

            String location = preRedirectResponse.getHeader( "Location" );

            return RestAssured.given()
                              .cookies(preRedirectResponse.getCookies())
                              .when().get(location)
                              .thenReturn();
        }

        /**
         * {
         *   emailCount = Integer
         *   subjectPattern = "String.*That_is_regex.*"
         *   dateAfter = (ISO 8601 Date"2018-05-10T17:24:58.000Z")
         *   timeout = Integer (seconds)
         * }
         * @param
         * @return Response
         */
        public Response checkEmail(String email, String subjectPattern, String emailSearchPastDate, Integer timeout) throws Exception {
            String serviceURL = emails.get( email );

            HashMap<String, Object> model = new HashMap<>(  );
            model.put( "emailCount", 10 );
            model.put( "subjectPattern", subjectPattern );
            model.put( "dateAfter", emailSearchPastDate );
            model.put( "timeout", timeout * 1000);

            JSONObject json = new JSONObject(model);

            Response response = null;
            if (serviceURL != null) {
                response = post( serviceURL, json );
                if(response.getBody().asString().equals( "{}" )) {
                    LOGGER.warn( "[ FAIL ] Did not find response data using request: " +
                                       json .toJSONString(), getCurrentMethodName());
                }
            } else {
                LOGGER.error( " [ FAIL ] Couldn't find the service url for account " +
                                   email, getCurrentMethodName() );
            }
            return response;
        }

        public String findEmailClickthroughLink(Response response, String htmlPatternToParse, String plaintextPatternToParse) throws Exception {
            String body = response.getBody().asString();
            findTextInEmail(body, plaintextPatternToParse, "PLAINTEXT");
            return findTextInEmail( body, htmlPatternToParse, "HTML" );
        }

        private String findTextInEmail(String sourceText, String regex, String emailType ) throws Exception{
            String targetText = "";

            Pattern pattern =  Pattern.compile( regex );
            Matcher matcher = pattern.matcher( sourceText.replace("\\", "") );
            if(matcher.matches()) {
                targetText = matcher.group(1)
                                    .replace("=", "=");
                LOGGER.info( " [ PASS ] Found a link from " + emailType + " email " +
                                   targetText, getCurrentMethodName() );
            }
            return targetText;
        }
    }
}

In the future you may modify your Google Apps Script by publishing a new version (or overwriting the existing one). Depending on the change, this modified “contract” of your proxy may also need to be updated correspondingly with the client application. With this in mind, you now have the power to use Google Apps Script to verify emails.


NOTE: In case you need extra configuration around security, you can take the more configurable approach by using the Gmail API directly.

Testing using Postman

Postman is a very handy tool for sending requests (which are mock-able) during development and while testing. This “post” will address some common ways Postman can be utilized in a testing effort.

1. Manual Testing

When you need to execute a specific request to a server postman allows you to send that directly. NOTE: If you are jumping back and forward from the browser and Postman (very common), you will want to sync your browser cookies with Postman via the Interceptor to share access to the session — this is a big time saver.

2. Automated BE Smoke Testing

For very common user scenarios, more often than not, you can automate  testing by sending critical requests necessary to mimic a users experience. For example, a user logs in, searches for a product, adds 2 then removes 1, submits their order, confirm their order history. Due to the stable nature of backend tests, this type of testing is recommended to have robust and as the core for Functional testing. Using Postman is faster than creating a custom test framework and it is intuitive to share the Postman collection tests with other members of your team (no documentation necessary 😉 ).

3. Performance Testing

If you have built out multiple user workflows in your Postman collection(s), you can utilize them by creating parameterized iterations with your CSV (more on that below). In order to see system thresholds, you can scale up the iterations (delays), or even run multiple collections simultaneously while monitoring your system. Admittedly, there are better tools to suit this purpose.

4. Bootstrapping

Very often there is a need to create data necessary for other services to work properly. Running a collection will allow all the requests to fire in sequence to perform the procedure you need. Often this is used for setting up a system or creating dummy data.

Making the most out of it

In order to fully maximize the effectiveness of Postman, be sure to take advantage of Pre-request script conditions, as well as the post-request Tests. With these you can manipulate variables stored between requests, as well as make assertions on the state of the request. Postman uses Javascript to run.

Next, there may be a set of data you would like to parameterize your requests with — this is done by binding that data to a variable ( {{variable}} ).

Taking variable binding another step further, you can pass in a CSV data set (a “table” with headers of variable names) to allow auto decoupling of the postman collection with the data it will use. This method of using CSV data set, will allow your collection to run N number of times (iterations) for the number of rows of data you have in your data set. When running (Postman Runner), you can specify a delay between iterations if necessary.

Finally, you can execute your postman collection(s) in your CI/CD system by way of Node.js and the Newman package.

Conclusion

Although postman is not as flexible as codifying your own solution for testing (not possible to run BE + FE hybrid tests, 3rd party library integration not supported, varying subscription plan restrictions, etc.) it certainly is a staple in any developing, and testing initiative.

How to enter the Tech industry as a Software Developer/Engineer

According to various sources, it is well known that one of the fastest growing professions in the nation is a Software Developer/Engineer. The nationwide  median for this progression is an annual $69K – $80K in 2019, compared to the estimated national median for all professions at $46.8K. This profession is thought to be highly desirable not only due to the monetary aspect, but also because:

  • The ease of finding similar job offerings
  • Health Benefits
  • Work schedule flexibility (even remote work days)
  • Promotion potential
  • Degree of worker satisfaction
  • Casual dress code

Obviously, entering this profession won’t resolve all of life’s problems. Some common complaints of this profession may include:

  • Long work hours for some projects
  • Fast pace
  • Lack of diversity

With that in mind, I would like to discuss a various approaches on how to enter the industry as a Software Developer.

1 – Go to college/university

This is a common approach for the many people who are young and fresh out of high school. Modern universities and colleges have various courses which are geared to prepare graduates with skills for entering the Software profession. For a more universally timeless approach it makes sense to choose Computer Science as a major. For the business savvy, or those more contextual minded, Information Technology is another option. Assuming you graduate, going to school practically guarantees you an entry level Software Developer job when you begin job searching — even better if you have a portfolio.

The obvious downside to going to college/university is the cost & time that you will have spent. It’s not rare to graduate with some debt from loans. It is also not uncommon to hear how unpractical the knowledge gained was upon entering the real world. For this reason, if you decide to go to school for 4 years, I’d advice taking per-requisite courses in a community/technical college before transferring your last 2 years to take the more focused major-relevant courses. With this, you save more money on tuition costs and have more wiggle room, if you decide to switch majors.

2 – Enroll in coding Boot-camp

This is a middle ground alternative I’d recommend for those with a specific idea on which area of expertise they would like to focus and/or, those who want to switch their current career to something in Tech but need a structured regimen to do so. In 2019, this is a popular approach considering the ocean of material one can find online for any development stack. Switchup.org has a really nice list of some coding boot-camps out there (i.e. App Academy, Flatiron School, Coding Dojo, etc).

Most of all these schools have a guaranteed job-placement post completion and some even defer tuition until you are hired. Some downsides of taking this approach is the cost (~$9K – ~20K), focus on specific stack technologies, and the intensiveness — it’s called boot-camp for a reason.  Overall it seems like a reasonable investment if you have the time to put in.

3 – Save enough money, quit your current position, and put aside a few months to build your portfolio

Made possible due to the plethora of information online today but a very arguable approach due to the risk level. But where there are risks, there are rewards, and this is worth mentioning. If you understand what a Software Developer position requires (certain skill-set around a stack (Front-end, Back-end, Devops, etc), ability to answer common interview questions (algorithm,s live coding, what would you do),  good communication, and possession of a curious and/or team-player state of mind), working up to your first job will be a matter of setting your goal, defining tasks, and spending the time to become well-versed in each of the key areas.

Taking this route will require lots of discipline and also access to the materials that will get you technically proficient. For example, if you would like to get a formal understanding of computer science concepts, you can enroll in an open university like Open or Edx, among many others.

Or maybe you need to understand the big picture but also have access to video walkthroughs of how to use a technology. That’s were sites like Pluralsight, Udemy, or Egghead come in. Reading official documentation is always the first recommendation though 😉

Once you have gained an understanding around how to use and develop, you should build your portfolio by working on a project, even better with if it’s on a team. You should at least have a github presences.

At this stage I would highly recommending learning a cloud platforms such as AWS, Azure, or GCP, if you have not. Many companies, large  and start-up are utilizing the cloud so it is good to play with and understand key services (storage, instance provisioning, architecture as code, lambda, etc). Getting AWS developer certified, for instance, will cost $150 but will help show prospective companies you understand the fundamentals.

Once you have all this under your belt, now is a good time to start taking practice interviews and hunting! Update your Linked profile, and head out to the job boards. At this point it will take time, but be patient and consistent in applying at the jobs that you are passionate about and highly desire. Be confident in your abilities because learning this much to switch careers means you are proactive and disciplined and highly adaptable, all common traits needed to become a successful Software Developer/Engineer.

Best of luck!

Salesforce – Unit test generator for profile field accessibility verification by XML

This brief post is a continuation of the prior one and discusses the possibility of generating tests from profile XML(s), rather than using SOQL. Note: This is basically a proof of concept that relies on reading a directory of profile xml files, then parsing the field accessibility values  based on a target Object. The fields gathered from the profile xml, are not exhaustive and thus may not result in passing tests. See the last post for a more accurate solution.

This script “generateProfileUnitTests.py” was created in Python 2.7, it will generate a sample Salesforce unit test named “generateProfileUnitTests.cls

#!/bin/python

"""
python generateProfileUnitTests.py -o 'Contact' -d 'C:\Salesforce\profiles'
"""

import sys
import xml.etree.ElementTree as ET
import argparse
from os import listdir
from os.path import isfile, join
import re

parser = argparse.ArgumentParser()                                               

parser.add_argument("--sobject", "-o", type=str, required=True)
parser.add_argument("--profiledirectorypath", "-d", type=str, required=True)
args = parser.parse_args()

sobject = args.sobject

filetemplatePre = """
@isTest
public class ContactObjectTest {{

    static String writeFieldName = 'PermissionsEdit';

    /**
    object = Contact
    profile = System Administrator
    **/
    private static void runProfileTest(String objectName, String profile, Map<String, Map<String, Boolean>> expectedPerms) {{
        Boolean success = true;
        try 
        {{
            List perms = [SELECT Id, Field, SObjectType, PermissionsRead, PermissionsEdit 
                FROM fieldPermissions 
                WHERE SObjectType = :objectName 
                AND parentId in ( SELECT id 
                    FROM permissionSet 
                    WHERE PermissionSet.Profile.Name = :profile)];
            
            Set nonExpectedFieldsFound = new Set();
            // Go through actual perms and make sure they exist if expected
            for(FieldPermissions perm  : perms) {{
                try {{
                    Map<String, Boolean> expectedPerm = expectedPerms.get(perm.Field);
                    System.assertEquals(expectedPerm.get(writeFieldName), perm.PermissionsEdit,
                        'Permission named ' + perm.Field + ' is ' + perm.PermissionsEdit + ' but expected ' + expectedPerm.get(writeFieldName)
                    );
                    // Should also create a copy and remove (to assert exact fields?)
                }} catch (NullPointerException e) {{
                    nonExpectedFieldsFound.add(perm.Field);
                    // Error is 'Attempt to de-reference a null object'
                    System.debug('Found a field that was not in expected permissions: ' + perm.Field);
                    success = false;
                }}
            }}
            System.assertEquals(0, nonExpectedFieldsFound.size(), 'Found Read only fields in ' + objectName + ' for ' + 
                'profile -- ' + profile + ' -- that were not in expected set: ' + nonExpectedFieldsFound);
        }} 
        catch (Exception e) 
        {{
            System.debug('Failed profile field test ' + e.getMessage());
            success = false;
        }} 
        finally 
        {{
	        System.assert(success);
        }}
    }}

	static Map<String, Boolean> createPerm(String writeName, Boolean value) {{
        Map<String, Boolean> perm = new Map<String, Boolean>();
        perm.put(writeName, value);
        return perm;
    }}

    /****************** PROFILE FIELD ACCESS TESTS *****************/
    {tests}
}}
"""

fileTemplateInsertTest = """
    static testMethod void test{sobject}ReadWriteFields{profileFormatted}Profile() {{
        runProfileTest('{sobject}', '{profile}', {expectedFieldsMethod}());
    }}

"""

fileTemplateInsertExpectedFeilds = """
    static Map<String, Map<String, Boolean>> get{sobject}{profileFormatted}Fields() {{
        Map<String, Map<String, Boolean>> {sobject}Fields = new Map<String, Map<String, Boolean>>();

        {insertExpectedFeild}

        return {sobject}Fields;
    }}

"""

fileTemplateInsertExpectedFeild = """
		{sobject}Fields.put('{fieldName}', createPerm(writeFieldName, {editFieldAccess}));"""

testFile = ''
tests = ''

for f in listdir(args.profiledirectorypath):
	if isfile(join(args.profiledirectorypath, f)):
		tree = ET.parse(join(args.profiledirectorypath, f))
		profileName = f.split('.')[0]

		expectedFeild=''

		for child in tree.getroot():
			if 'fieldPermissions' in child.tag:
				# Get field
				fieldName = child.find('{http://soap.sforce.com/2006/04/metadata}field')
				if sobject + '.' in fieldName.text:
					editable = child.find('{http://soap.sforce.com/2006/04/metadata}editable')
					# readable = child.find('{http://soap.sforce.com/2006/04/metadata}readable')
					expectedFeild+=fileTemplateInsertExpectedFeild.format(sobject=sobject,
																			fieldName=fieldName.text,
																			editFieldAccess=editable.text)
		profileFormatted=re.sub('[^a-zA-Z]+', '', profileName) 
		insertExpectedFields=fileTemplateInsertExpectedFeilds.format(sobject=sobject, 
																profileFormatted=profileFormatted, 
																insertExpectedFeild=expectedFeild)

		insertTest=fileTemplateInsertTest.format(sobject=sobject,
												 profileFormatted=profileFormatted,
												 profile=profileName,
												 expectedFieldsMethod='get' + sobject + profileFormatted + 'Fields')
		tests+=insertExpectedFields
		tests+=insertTest

testFile = filetemplatePre.format(tests=tests)
f = open('generateProfileUnitTests.cls', 'w')
f.write(testFile)
f.close

 

Salesforce – Unit test generator for profile field accessibility verification

When testing Salesforce, there is often a desire to test the view(s) of a workflow as different users. A common strategy for this is to add automation on the UI, using a functional automation tool such as Selenium.

Depending on the number of profiles in your Salesforce organization, this is a very time consuming and brittle process — it entails running the same workflow for users of a unique profile, while checking both Read, and Write accessibility for many field elements (this is also dependent on the page layout).

Taking this route, we may run the risk of inverting our test pyramid. What we can do to remedy this issue is fairly simple since we know profile configuration is accessible from XML and also using SOQL to query object permissions. So this begs the question, “How can we structure a test to verify field permission accessibility for a given profile”?

1) Overall test case (visit this link to understand Salesforce unit testing)

@isTest
public class ContactObjectTest {

    static testMethod void testContactReadWriteFieldsSystemAdministratorProfile() {
        runProfileTest('Contact', 'System Administrator', getContactSystemAdministratorFields());
    }
}

2) Flesh out the generator

@isTest
public class ContactObjectTest {

    static String writeFieldName = 'PermissionsEdit';

    /**
    object = Contact
    profile = System Administrator
    **/
    private static void runProfileTest(String objectName, String profile, Map<String, Map<String, Boolean>> expectedPerms) {
        Boolean success = true;
        try 
        {
            List perms = [SELECT Id, Field, SObjectType, PermissionsRead, PermissionsEdit 
                FROM fieldPermissions 
                WHERE SObjectType = :objectName 
                AND parentId in ( SELECT id 
                    FROM permissionSet 
                    WHERE PermissionSet.Profile.Name = :profile)];
            
            Set nonExpectedFieldsFound = new Set();
            // Go through actual perms and make sure they exist if expected
            for(FieldPermissions perm  : perms) {
                try {
                    Map<String, Boolean> expectedPerm = expectedPerms.get(perm.Field);
                    System.assertEquals(expectedPerm.get(writeFieldName), perm.PermissionsEdit,
                        'Permission named ' + perm.Field + ' is ' + perm.PermissionsEdit + ' but expected ' + expectedPerm.get(writeFieldName)
                    );
                } catch (NullPointerException e) {
                    nonExpectedFieldsFound.add(perm.Field);
                    System.debug('Found a field that was not in expected permissions: ' + perm.Field);
                    success = false;
                }
            }
            System.assertEquals(0, nonExpectedFieldsFound.size(), 'Found Read only fields in ' + objectName + ' for ' + 
                'profile -- ' + profile + ' -- that were not in expected set: ' + nonExpectedFieldsFound);
        } 
        catch (Exception e) 
        {
            System.debug('Failed profile field test ' + e.getMessage());
            success = false;
        } 
        finally 
        {
            System.assert(success);
        }
    }
}

3) Add the test specific expected field accessibility map (createPerm, getContactSystemAdministratorFields methods)

@isTest
public class ContactObjectTest {

    static String writeFieldName = 'PermissionsEdit';

    /**
    object = Contact
    profile = System Administrator
    **/
    private static void runProfileTest(String objectName, String profile, Map<String, Map<String, Boolean>> expectedPerms) {
        Boolean success = true;
        try 
        {
            List perms = [SELECT Id, Field, SObjectType, PermissionsRead, PermissionsEdit 
                FROM fieldPermissions 
                WHERE SObjectType = :objectName 
                AND parentId in ( SELECT id 
                    FROM permissionSet 
                    WHERE PermissionSet.Profile.Name = :profile)];
            
            Set nonExpectedFieldsFound = new Set();
            // Go through actual perms and make sure they exist if expected
            for(FieldPermissions perm  : perms) {
                try {
                    Map<String, Boolean> expectedPerm = expectedPerms.get(perm.Field);
                    System.assertEquals(expectedPerm.get(writeFieldName), perm.PermissionsEdit,
                        'Permission named ' + perm.Field + ' is ' + perm.PermissionsEdit + ' but expected ' + expectedPerm.get(writeFieldName)
                    );
                } catch (NullPointerException e) {
                    nonExpectedFieldsFound.add(perm.Field);
                    System.debug('Found a field that was not in expected permissions: ' + perm.Field);
                    success = false;
                }
            }
            System.assertEquals(0, nonExpectedFieldsFound.size(), 'Found Read only fields in ' + objectName + ' for ' + 
                'profile -- ' + profile + ' -- that were not in expected set: ' + nonExpectedFieldsFound);
        } 
        catch (Exception e) 
        {
            System.debug('Failed profile field test ' + e.getMessage());
            success = false;
        } 
        finally 
        {
            System.assert(success);
        }
    }

    static Map<String, Boolean> createPerm(String writeName, Boolean value) {
        Map<String, Boolean> perm = new Map<String, Boolean>();
        perm.put(writeName, value);
        return perm;
    }

    /****************** PROFILE FIELD ACCESS TESTS *****************/
    
    static Map<String, Map<String, Boolean>> getContactSystemAdministratorFields() {
        Map<String, Map<String, Boolean>> ContactFields = new Map<String, Map<String, Boolean>>();

        
        ContactFields.put('Contact.Title', createPerm(writeFieldName, True));
        ContactFields.put('Contact.ReportsTo', createPerm(writeFieldName, True));
        ContactFields.put('Contact.Phone', createPerm(writeFieldName, True));
        ContactFields.put('Contact.OtherPhone', createPerm(writeFieldName, True));
        ContactFields.put('Contact.OtherAddress', createPerm(writeFieldName, True));
        ContactFields.put('Contact.MobilePhone', createPerm(writeFieldName, True));
        ContactFields.put('Contact.MailingAddress', createPerm(writeFieldName, True));
        ContactFields.put('Contact.LeadSource', createPerm(writeFieldName, True));
        ContactFields.put('Contact.Jigsaw', createPerm(writeFieldName, True));
        ContactFields.put('Contact.HomePhone', createPerm(writeFieldName, True));
        ContactFields.put('Contact.HasOptedOutOfFax', createPerm(writeFieldName, True));
        ContactFields.put('Contact.HasOptedOutOfEmail', createPerm(writeFieldName, True));
        ContactFields.put('Contact.Fax', createPerm(writeFieldName, True));
        ContactFields.put('Contact.Email', createPerm(writeFieldName, True));
        ContactFields.put('Contact.DoNotCall', createPerm(writeFieldName, True));
        ContactFields.put('Contact.Description', createPerm(writeFieldName, True));
        ContactFields.put('Contact.Department', createPerm(writeFieldName, True));
        ContactFields.put('Contact.Birthdate', createPerm(writeFieldName, True));
        ContactFields.put('Contact.AssistantPhone', createPerm(writeFieldName, True));
        ContactFields.put('Contact.AssistantName', createPerm(writeFieldName, True));
        ContactFields.put('Contact.Account', createPerm(writeFieldName, True));
        ContactFields.put('Contact.Time_Zone__c', createPerm(writeFieldName, True));
        ContactFields.put('Contact.Suffix__c', createPerm(writeFieldName, True));
        ContactFields.put('Contact.Seasonal_Only__c', createPerm(writeFieldName, True));
        ContactFields.put('Contact.Salutation__c', createPerm(writeFieldName, True));
        ContactFields.put('Contact.SMSEnabled__c', createPerm(writeFieldName, True));
        ContactFields.put('Contact.Rehire_Location__c', createPerm(writeFieldName, True));
        ContactFields.put('Contact.Rehire_Eligibility_Status__c', createPerm(writeFieldName, True));
        ContactFields.put('Contact.Previously_Used_Full_Name__c', createPerm(writeFieldName, True));
        ContactFields.put('Contact.Preferred_Phone_Number__c', createPerm(writeFieldName, True));
        ContactFields.put('Contact.Portal_User__c', createPerm(writeFieldName, True));
        ContactFields.put('Contact.Portal_User_Link__c', createPerm(writeFieldName, False));
        ContactFields.put('Contact.Override_Flag__c', createPerm(writeFieldName, True));
        ContactFields.put('Contact.Mobile_Phone__c', createPerm(writeFieldName, True));
        ContactFields.put('Contact.Mobile_Phone_Country_Code__c', createPerm(writeFieldName, True));
        ContactFields.put('Contact.Middle_Name__c', createPerm(writeFieldName, True));
        ContactFields.put('Contact.Last_Name__c', createPerm(writeFieldName, True));
        ContactFields.put('Contact.Language__c', createPerm(writeFieldName, True));
        ContactFields.put('Contact.Internal_External__c', createPerm(writeFieldName, True));
        ContactFields.put('Contact.Internal_Email__c', createPerm(writeFieldName, True));
        ContactFields.put('Contact.Internal_Candidate__c', createPerm(writeFieldName, True));
        ContactFields.put('Contact.Home_Phone__c', createPerm(writeFieldName, True));
        ContactFields.put('Contact.Home_Phone_Country_Code__c', createPerm(writeFieldName, True));
        ContactFields.put('Contact.First_Name__c', createPerm(writeFieldName, True));
        ContactFields.put('Contact.External_Email__c', createPerm(writeFieldName, True));
        ContactFields.put('Contact.Employee_ID__c', createPerm(writeFieldName, True));
        ContactFields.put('Contact.EMPL_Rcd_No__c', createPerm(writeFieldName, True));
        ContactFields.put('Contact.Current_Mailing_Adddress__c', createPerm(writeFieldName, True));
        ContactFields.put('Contact.Country_Code_PS__c', createPerm(writeFieldName, True));
        ContactFields.put('Contact.Contact_Profile_Submitted__c', createPerm(writeFieldName, True));
        ContactFields.put('Contact.Candidate_ID__c', createPerm(writeFieldName, True));
        ContactFields.put('Contact.Agency_Name__c', createPerm(writeFieldName, True));
        ContactFields.put('Contact.Address_Line_2__c', createPerm(writeFieldName, True));

        return ContactFields;
    }


    static testMethod void testContactReadWriteFieldsSystemAdministratorProfile() {
        runProfileTest('Contact', 'System Administrator', getContactSystemAdministratorFields());
    }
}

Now that we have an idea on how we’ve created our unit test to verify field permissions under the System Administrator profile, extending the test to add other profiles is as simple as adding the testMethod, along with getObjectProfileFields map. Since this is also reusable for objects (Account, Contact, etc) we can create a generator that cranks out tests for a given Object and the desired Profiles.

Here’s a script to do so in Python 3.7.2. There are 4 required parameters, access token, instance url, profiles (comma seperated), and object. You can save this as generateProfileUnitTestsFromSoql.py

#!/bin/python

"""
> python.exe generateProfileUnitTestsFromSoql.py 
-t '00D110000001O34!ARIAQLW5MsJqTVUbwgl13xDW_UGvZBG5GEJC.4bxsuzWc.ehOrnuRhT.MtMSrb0wCP07wfc71C6gEOnsSP0CknZnPdkzDUnc' 
-u 'https://customDomain.my.salesforce.com' 
-p 'System Administrator,Alternative-System Administrator,Standard User' 
-o Contact
"""

import argparse
import requests
import re

parser = argparse.ArgumentParser()                                               

parser.add_argument("--authtoken", "-t", type=str, required=True)
parser.add_argument("--instanceurl", "-u", type=str, required=True)
parser.add_argument("--sobject", "-o", type=str, required=True)
parser.add_argument("--profilenames", "-p", type=str, required=True)

args = parser.parse_args()

sobject = args.sobject
token = args.authtoken
instanceUrl = args.instanceurl
profileNames = args.profilenames.split(',')

filetemplatePre = """
@isTest
public class ContactObjectTest {{

    static String writeFieldName = 'PermissionsEdit';

    /**
    object = Contact
    profile = System Administrator
    **/
    private static void runProfileTest(String objectName, String profile, Map<String, Map<String, Boolean>> expectedPerms) {{
        Boolean success = true;
        try 
        {{
            List perms = [SELECT Id, Field, SObjectType, PermissionsRead, PermissionsEdit 
                FROM fieldPermissions 
                WHERE SObjectType = :objectName 
                AND parentId in ( SELECT id 
                    FROM permissionSet 
                    WHERE PermissionSet.Profile.Name = :profile)];
            
            Set nonExpectedFieldsFound = new Set();
            // Go through actual perms and make sure they exist if expected
            for(FieldPermissions perm  : perms) {{
                try {{
                    Map<String, Boolean> expectedPerm = expectedPerms.get(perm.Field);
                    System.assertEquals(expectedPerm.get(writeFieldName), perm.PermissionsEdit,
                        'Permission named ' + perm.Field + ' is ' + perm.PermissionsEdit + ' but expected ' + expectedPerm.get(writeFieldName)
                    );
                }} catch (NullPointerException e) {{
                    nonExpectedFieldsFound.add(perm.Field);
                    System.debug('Found a field that was not in expected permissions: ' + perm.Field);
                    success = false;
                }}
            }}
            System.assertEquals(0, nonExpectedFieldsFound.size(), 'Found Read only fields in ' + objectName + ' for ' + 
                'profile -- ' + profile + ' -- that were not in expected set: ' + nonExpectedFieldsFound);
        }} 
        catch (Exception e) 
        {{
            System.debug('Failed profile field test ' + e.getMessage());
            success = false;
        }} 
        finally 
        {{
            System.assert(success);
        }}
    }}

    static Map<String, Boolean> createPerm(String writeName, Boolean value) {{
        Map<String, Boolean> perm = new Map<String, Boolean>();
        perm.put(writeName, value);
        return perm;
    }}

    /****************** PROFILE FIELD ACCESS TESTS *****************/
    {tests}
}}
"""

fileTemplateInsertTest = """
    static testMethod void test{sobject}ReadWriteFields{profileFormatted}Profile() {{
        runProfileTest('{sobject}', '{profile}', {expectedFieldsMethod}());
    }}

"""

fileTemplateInsertExpectedFeilds = """
    static Map<String, Map<String, Boolean>> get{sobject}{profileFormatted}Fields() {{
        Map<String, Map<String, Boolean>> {sobject}Fields = new Map<String, Map<String, Boolean>>();

        {insertExpectedFeild}

        return {sobject}Fields;
    }}

"""

fileTemplateInsertExpectedFeild = """
        {sobject}Fields.put('{fieldName}', createPerm(writeFieldName, {editFieldAccess}));"""

testFile = ''
tests = ''

for profileName in profileNames:
    response = requests.get(instanceUrl + "/services/data/v44.0/query?q=" 
                "SELECT Id, Field, SObjectType, PermissionsRead, PermissionsEdit FROM fieldPermissions "
                "WHERE SObjectType = '" + sobject + "' AND parentId in " 
                "( SELECT id FROM permissionSet WHERE PermissionSet.Profile.Name = '" + profileName + "')", 
                headers={'Authorization': 'Bearer ' + token})

    expectedFeild=''

    for record in response.json()['records']:
        # Get field
        fieldName = record['Field']
        editable = record['PermissionsEdit']
        # readable = record['PermissionsRead']

        expectedFeild+=fileTemplateInsertExpectedFeild.format(sobject=sobject,
                                                                fieldName=fieldName,
                                                                editFieldAccess=editable)
    profileFormatted=re.sub('[^a-zA-Z]+', '', profileName) 
    insertExpectedFields=fileTemplateInsertExpectedFeilds.format(sobject=sobject, 
                                                            profileFormatted=profileFormatted, 
                                                            insertExpectedFeild=expectedFeild)

    insertTest=fileTemplateInsertTest.format(sobject=sobject,
                                             profileFormatted=profileFormatted,
                                             profile=profileName,
                                             expectedFieldsMethod='get' + sobject + profileFormatted + 'Fields')
    tests+=insertExpectedFields
    tests+=insertTest

testFile = filetemplatePre.format(tests=tests)
f = open('generateProfileUnitTests.cls', 'w')
f.write(testFile)
f.close
 

Mission critical Git commands

Git has become a staple tool for managing version control in modern development. Being a very powerful tool, the capabilities it provides are extensive. But for everyday purposes, you may revisit a core set of commands over, and over, and over, and over again. Below are some very frequented commands that should be known to all git users.

COMMON (Daily)

  • git pull — Pull the latest head from remote, merging into the head of local branch
    • git pull
  • git add — Stage commits that have been modified, newly added, or deleted
    • git add -u
  • git commit — Create a new commit out of the staged files
    • git commit -m “doc – My message commit”
  • git diff — Discover the difference between a commit (default latest) and unstaged changes
    • git diff fb1b7
  • git log — Review the log of commits
    • git log
  • git checkout — Often for checkout of branches but also restoring files
    • git checkout -b feature-myNewBranch
  • git reset — Reverts the HEAD to another commit
    • git reset –hard abd43
  • git rebase — Squashing commits, for log hygiene
    • git rebase -i HEAD~3
  • git push –– Push the HEAD of current branch to a given remote
    • git push origin

UNCOMMON (Every now and then)

  • git fetch — Retrieve the latest head from origin
  • git init –– Create a new git repository (for one that does not have a remote)
  • git clone {url}– Clone a git repository from an existing one (on some remote)
  • git tag -a myNewTag -m “Tag description” — Create a new tag

In addition to these commands, some users may prefer to use a GUI tool to provide an friendly interface to perform Git tasks. Tools like Git Kraken, or Source Tree.

The argument for Behavior-Driven Development (BDD)

In most development efforts, the features and capabilities defined will come from the stakeholder(s) who are sponsoring the development — if not yourself. The stakeholders will interact with someone technically proficient, who will be the decider of what gets scheduled, prioritized, designed, and implemented. Often this person takes the role of a Product Owner/Manager. 

Since one of the main focuses in a Product Owner’s day-to-day is understanding requirements and making sure features are delivered as expected — bug free — they will often need a window to judge if this is the case. One way this can be done is writing up a Specification document for a feature and working with a test team to ensure a Test Plan with appropriate Test Cases are created. At that point the Product Owner can decide if sufficient cases and coverage have been accounted for.

This approach is nice if resources have been dedicated to ensuring each test case gets run and can report on the statuses, both while developing a new feature, and during regression. In theory it is nice but not easy to keep in lockstep.

Behavior-Driven Development (BDD) to the rescue!

An alternative approach that also allows Product Owners to understand the extent of feature developed, and their effort to synchronize with a test team is to utilize BDD (A form of TDD that focuses on UAT (User acceptance testing)). In this context, User Stories  are created by the Product Owner by way of working with stakeholders and put into a backlog of stories. Each, scenario describes a specific thing that a user would do. These would be descriptive and accurate. For example in a Auction Website platform you may have a scenario:

As an existing member to the U-Sell-It Auction Site
when I bid on a product that already has bids
and my bid is lower than prior bids,
then a message is displayed that my bid amount is too low

As you can see, this is very clear to a Product Owner, and nearly anyone who is looking at the scenario! Also, when products features / capabilities are framed in this way, it helps to identify potential gaps.

How will test use this?

In a testing effort, many BDD frameworks can be used such as Cucumber, and JBehave. At first, adding another DSL to a project may seem like overhead — especially if testing is performed by a team with “test” expertise — and that is a common complaint among many would-be-adopters of using a BDD framework. Though, the value gained from using it outweighs the value of not…

Benefits:

  • “Transparency” in the tests created. Tests can be shared with anyone and are highly understandable (it is still possible to map the DSL to badly designed & inaccurate code…)
  • Logs. Much more readable and can be easy to identify the step of failure.
  • Separation of concerns. Anyone can create new tests, edit existing ones at a high level.
  • May help drive better design decisions when creating the code used by the DSL (making generic & more reusable).

Drawbacks:

  • BDD framework needs to be learned.
  • Custom code may be required to interact with the DSL (previously available out-of-the-box when used without the framework).
  • Another dependency.
  • New layer to the existing test project + more code.

For these reasons among others, a BDD framework can be a very effective component to add in your development life-cycle.